El Castillo del los Pollos de Dun Hagan
Which if I have not butchered the Spanish too badly should translate as "The Chicken Castle of Dun Hagan."
Yes, we are back in the poultry business again. I've recovered from the loss of our two previous flocks to predators and have once again taken up hen keeping.
This latest venture started back in February with the annual arrival of day-old chicks at the local farm supply stores. In fact they sort of took me by surprise as I seemed to remember they didn't come in until the beginning of March so I hadn't finished getting the brooder set up. This only took an hour or so then I was ready to go. The farm supply I usually trade with generally purchases Plymouth Barred Rocks, Rhode Island Reds, and "Americaunas" which are really just Easter Eggers (mutt birds that lay green or blue tinted eggs). I picked up ten Barred Rocks, five Rhode Island Reds and two of the Easter Eggers for swank. I also had them order five Buff Orpingtons and five Black Australorps as well as I have particular goals in breeding birds in mind this time around.
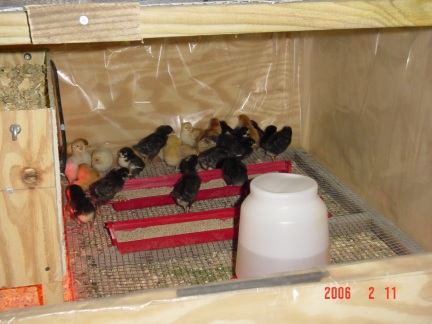 This first photo is the inside of the brooder where you can see the chicks not long after I put them in. The darkest colored birds are the Black Australorps (short for Black Australian Orpington), the black and white chicks are the Barred Rocks, the cinnamon birds are the Rhode Island Reds, and the gold/buff chicks are the Buff Orpingtons. You can't really make them out, but the two yellow/white chicks are the Easter Eggers.
The feeders and water sit on top of a hardware cloth frame to keep shavings out of the food and water and to keep the chicks out of any wet bedding if there is a water spill. It's not a perfect solution, but works better than anything else I've come up with so far.
The second and third photos show more of the brooder itself.
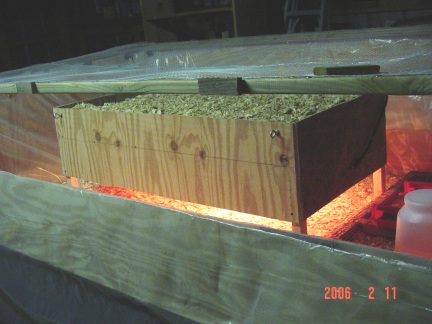
The box is based on a full sheet of plywood with another sheet and a half cut to make the walls. The whole thing bolts together with carriage bolts then the inside is lined with sheet plastic. When the brooder is no longer needed I can spread the used brooder bedding on the garden, throw away the used plastic, then disassemble the box to stack flat for storage out of the way. This is the second time I've used it now and it worked pretty much as I had originally planned it which is not the usual for things that I build.
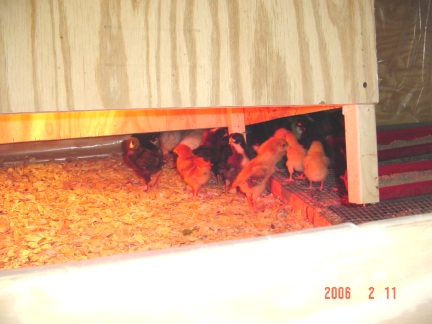
Also shown in the second photo and a closer view in the third photo is the hover the chicks shelter under to stay warm. This is a design the Ohio Cooperative Extension developed in 1942 as a way to improve chick brooding in spite of wartime materials shortages that was rediscovered by Robert Plamondon. The original design was for 200 chicks which was about the average chick flock size on the commercial farms of the period. I downsized it to a fifty chick size which is about as many as I care to handle at one time.
What makes this particular hover interesting is that it allows the chicks to regulate their own temperatures. If they're cold they go further under the hover. If they're hot they move further out. No need for thermostatic control which is expensive and could malfunction. Another bonus is the recessed top allows one to fill it full of dry bedding which serves as insulation. This allows one to use a smaller bulb than otherwise be needed because the rising heat is trapped by the insulation. This also tends to make it somewhat proof against power failures as well. I had a first-hand experience with this about a week after I took the photos when I unwittingly turned their power off one below-freezing morning before I went to work. It was ten hours before I came home to discover my mistake and I fully expected to find a brooder full of dead chicks! To my surprise when I lifted it up I found them all nestled down into the bedding under the hover, cold, but still alive. The overhead insulation in the hover and the dry bedding they dug into had kept them warm until I came home again. I immediately turned the power back on and in about ten minutes they'd warmed up again and were acting completely normal. Had I been using the usual lightbulb hanging overhead like I've always used in the past I'm sure I'd have lost them all.


 The four photos to the left show the new henyard and roosthouse. I've given up on total free-ranging poultry until I can get one or more trained livestock guardian dogs. There is just too much predator pressure here for that to work.
So, now what I have is the traditional fenced yard and hen house. When we are home in the evenings before the sun goes down we let the birds out to forage for the last hour or so before they go to roost. This allows them to get the greenfeed they want which keeps the egg yolks nicely yellow. If I were starting completely from scratch the setup would look different, but as I had leftovers from the previous two flocks that I did not want to throw away I incorporated what I could of it into the new arrangement.
The yard itself measures twenty six feet long by twenty feet wide. The fence is two inch welded wire (an old roll I had in the shop) five feet high. You can't really see it in the pictures, but I used plastic coated two inch welded wire at the bottom where I trenched out the entire fenceline a foot and a half deep then ran the wire through with the bottom splayed outward from the fence. When predators dig they always start right at the bottom of the fence so if they try to dig in now they run into the buried wire which will force them to move further back and dig a much larger, deeper hole to get in. To date none have attempted such an excavation. I've found a few places where something tried to dig in, but they stopped when they hit the buried wire. There is a row of concrete block buried under the gate and the roosthouse itself is sitting on a block foundation which its own wire buried around the outside.
Over the top is my raptor protection system. It is basically just that center post as you see it with a steel stake secured to it. Using seventeen and fourteen gauge electric fence wire I would start at one point of the fence, run to the center post, wrap once around it at the top to keep the wire from slipping then down to the opposite point of the fence on the other sidew where I'd pull it tight and tie it off to the fence. Then I'd move 12 to 14 inches down and do it again until I had gone completely around the yard. It's been six months now and nothing larger than a cardinal has flown down through the wire. A hawk or owl could certainly dive through the gaps to kill a chickento, but they wouldn't be able to fly out again as they'd need to be flapping their wings to generate lift and the wire is too close together for their wing spans. So far I'm pretty happy with it.
I made the photos not long after I put the birds in so the nest boxes hadn't been put in yet nor had I built and installed the feed storage shelter which also contains the electric fence charger and its battery. Completely around the outside top of the fence I have run a hot wire to keep coons from climbing in over the top of the fence. So far it has worked just as I had intended. I need to reinstall the hot wire though as it drains the charger battery faster than I believe it should because I have it running too close to the grounded wire which sets up induction losses.
The roost house itself is left over from the two previous flocks. It was originally supposed to be a portable house, but I built it too heavy so it never really worked as I had intended. This time around I laid solid concrete block down for a foundation then set the house on top of them. I then trenched out the perimeter of the foundation and buried two foot poultry wire to discourage anything from trying to dig under and it has worked so far as I had intended. I removed the rear wall and replaced it with a pair of doors that open up more widely so that I can get into fork out the old litter for the garden and replace it with fresh.
The little mulberry tree inside the yard has more than tripled in size since that photo was taken. A constant diet of chicken manure seems to agree with it. {laughing}.
The birds that you can see in the yard are the original flock that I brooded in February - ten Plymouth Barred Rocks, five Rhode Island Reds, five Buff Orpingtons, five Black Australorps, and the two Easter Eggers. One of those turned out to be snow white so you can see her easily. The other is colored a Buff Orpington gold over white and they are named respectively Snowball and Marshmallow, the last being the color of a perfectly roasted marshmallow. Snowball turned out to lay an aquamarine colored egg while Marshmallow lays a light olive tinted egg (when she lays). All the rest lay varying shades of medium to light brown with one unknown hen laying a cream colored egg.
Four of those ten Barred Rocks I gave to our friends Bob & Susan who are keeping them in a portable hen house he built for the purpose. I lost one Barred Rock to reasons unknown, just found her dead in the yard one day with no apparent signs of injury. So I now have five of each of the dual-purpose breeds.
Of course in the way these things often seem to work my original plan went out the window as not terribly long after I moved the original flock into the big house I bought six Silkie chicks from a local breeder. These are an exotic bantam breed that look very different from an ordinary chicken. Unfortunately, because they are small and very gentle birds they are veritable predator magnets so I have lost four of the six much to my disappointment. Except for the one Barred Rock hen the Silkies have been my only bird losses which is too bad as they grow on you after a while.
I don't have any good photos of mine at the moment to show but I did find some photos on the net of other birds of the same breed. The first one is from Feathersite of a Blue Silkie rooster much like the one I have.

The second one is a Partridge Silkie hen also from Feathersite that is close in appearance to the Partridge hen that I have. I originally purchased them because they have a reputation as being excellent broodies and mothers so I thought I'd give them a go.

My departure from my plan did not stop there though. After the Silkies were old enough to leave the brooder I then picked up thirteen straight-run Cuckoo Maran chicks. Although they look very nearly exactly like Plymouth Barred Rocks they are a French breed that has very little of the same ancestry as the Barred Rock.
The easiest way to tell the two breed apart is that Barred Rocks have yellow legs while pure-bred Marans will have white legs. The barring on the Marans is also not as sharply defined as Barred Rocks have, but you pretty much have to have a bird of each breed standing side-by-side to really see that.
What makes them interesting is that well-bred Marans lay a dark colored egg very nearly the shade of milk chocolate as can be seen in this photo also from Feathersite.
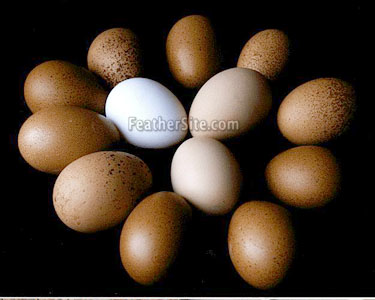
Of course shell color has nothing to do with either the taste or nutrition of an egg, but many folks are intrigued by the dark brown hue. Seeing as how many of the main brown egg laying breeds have been laying progressively lighter and lighter shades of brown I thought it would be good to put a little darkness back into the shell color. The pullets haven't started laying yet so I don't know how dark their shell color is going to be, but they shouldn't be much longer. The cockerels (seven pullets, six cockerels) will grace the Dun Hagan table as the stars of another famous French creation - coq au vin.
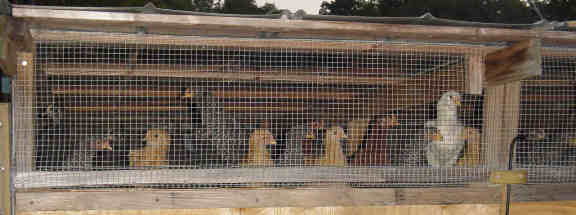
This last photo is a partial line up of the original flock about a week or so after I moved them to the roosthouse. The back of the roosthouse faces north and is where the highest roosts are located. Chickens naturally prefer to roost high so you can find them there every night looking out the window. You can also get a fair idea of where a given birds is located in the flock pecking order by which roost pole they are located on. The top of the pecking order is on the highest pole, the lesser birds on the lower poles.
 I'll try to get some photos taken these next few days to show what the Dun Hagan poultry operation looks like at the moment now in November.
.....Alan.
Labels: poultry
posted by Alan @ 1:29 PM
![]()
![]()


0 Comments:
Post a Comment
<< Home